How to Remove Background from Glass Products (Phot.ai Tutorial, 2026)
⚡ Quick Verdict
This is Part 2 of my Phot.ai series. If you haven’t read the full review yet — I spent a day stress-testing Phot.ai on real products. This tutorial is the practical follow-up: how to actually…
This is Part 2 of my Phot.ai series. If you haven’t read the full review yet — I spent a day stress-testing Phot.ai on real products. This tutorial is the practical follow-up: how to actually use it for the hardest product type in ecommerce — transparent glass.
This is another installment in my Phot.ai review series — here’s how it handles transparent objects.
Let me be real — removing the background from a glass product is the final boss of product photography. Solid objects? Any AI tool can handle those. But glass? Transparent, reflective, catches every light source wrong. Most AI background removers look at a glass bottle and go full existential crisis: “Is this… nothing? Is this… something? I don’t know anymore.”
I tested Phot.ai specifically on this pain point. Here’s the step-by-step walkthrough — including where it nails it, where it faceplants, and exactly what you need to do when it gets confused.
My Test Setup
Same setup as the full review: a clear glass of sparkling water — ice cubes, bubbles, condensation. The kind of subject that makes AI tools cry.
- Tool tested: Phot.ai Background Remover (free workspace, 20 credits)
- Subjects: Clear glass (hard mode), opaque object (control test)
- Backgrounds: Restaurant preset, Sunny Poolside preset
- Time spent: ~30 minutes including manual refinement
Step 1: Upload Your Glass Product Image
Upload a high-resolution photo of your glass product. Phot.ai works best with well-lit, front-facing shots against a clean background. Avoid busy backgrounds — the AI needs a clear subject boundary to work with.
Pro tip: If your glass product has a label (wine bottle, sauce jar), make sure the label is fully visible. Phot.ai uses it as an anchor to distinguish “glass” from “background.”
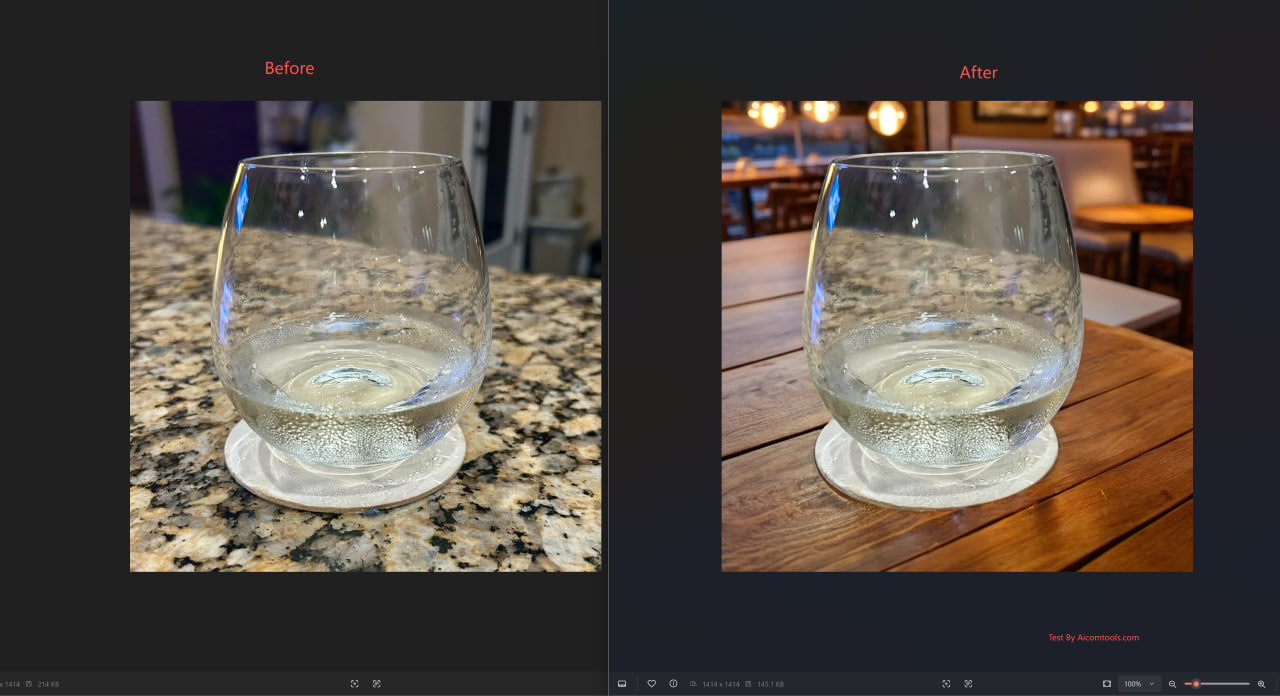
↑ My test subject — a clear glass of sparkling water. This is where most AI background removers fail.
Step 2: Choose Your Background Mode
Phot.ai offers several background modes. For glass products, here’s what I found works best:
| Mode | Best for | Glass performance |
|---|---|---|
| Remove Background | White/transparent BG (Amazon, eBay) | ✅ Good — clean edge detection on the glass rim |
| Background Replace (solid preset) | Simple color backgrounds | ✅ Good — no artifacts on transparent areas |
| Background Replace (scene preset) | Complex scenes like “Restaurant” or “Poolside” | ⚠️ Hit or miss — works with well-lit scenes, struggles with complex lighting |
For this test, I used Background Replace with the “Elegant Restaurant” preset first. Result was solid — edge detection was clean with no halo artifacts around the rim.
Step 3: The Critical Step — Manual Refinement (Where Most Users Give Up)
This is the step that separates “AI generated junk” from “actual usable product photos.” Phot.ai has a Manual Refine mode that lets you brush over areas the AI misidentified.
Here’s where things went wrong — and why this matters
When I switched the background to “Sunny Poolside,” Phot.ai completely faceplanted. I found 4 issues that any experienced seller would spot instantly:
- Reflection mismatch: The poolside background is bright and sunny, but the water reflection inside the glass looks overcast. The light sources don’t agree — a dead giveaway that the image is composited.
- Blue color bleed: Left side of the glass has a 10-pixel strip of blue residue from the original background that Phot.ai didn’t fully remove.
- CGI-feeling pool water: The “pool” in the background looks like a 2015 video game — fake turquoise, no depth, no light caustics.
- Lost transparency: The glass turned semi-opaque, like frosted plastic. The whole point of a clear glass is that it’s transparent.
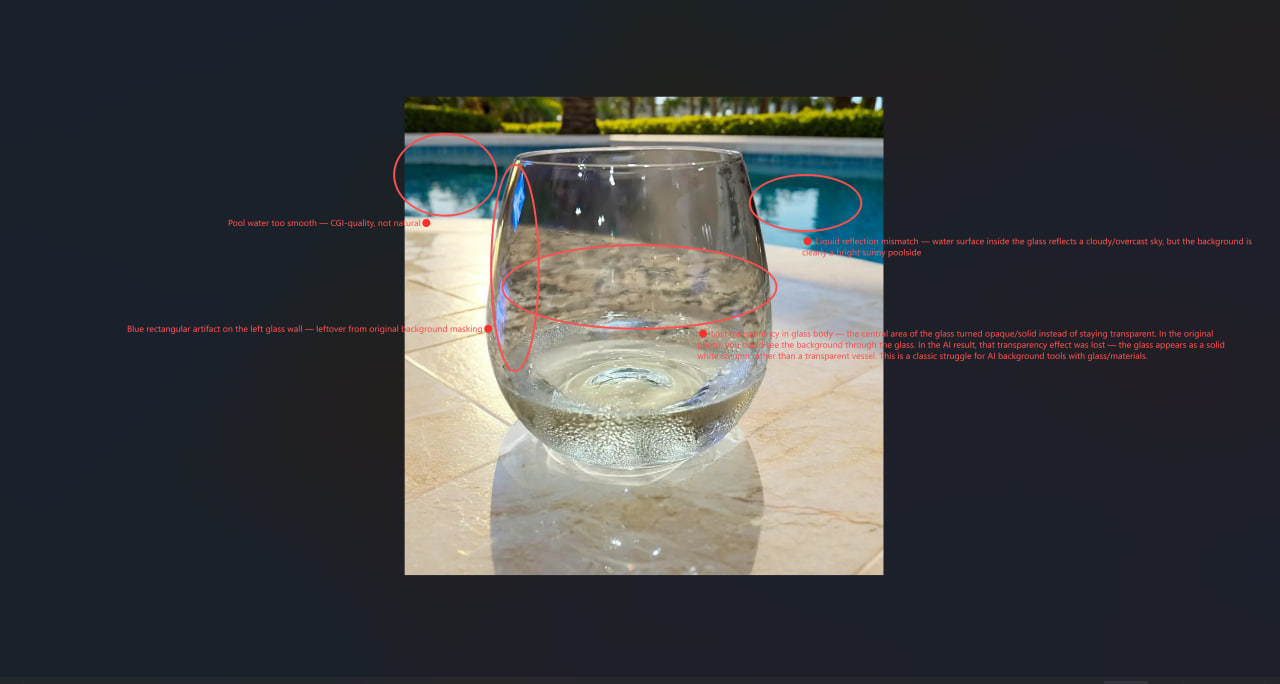
↑ This is where Phot.ai dropped the ball. The glass lost its transparency, and the background feels fake. You’ll need Manual Refine to fix this.
How to fix it with Manual Refine
When you see issues like this, don’t just accept the default output. Here’s what to do:
- Click “Refine” below the output image
- Use the “Keep” brush (green) to paint over the glass body — this tells the AI “this is not background, keep it”
- Use the “Remove” brush (red) to clean up any background residue on the glass edges
- Zoom into 200% and check the rim — this is where color bleed hides
- Click “Apply” and regenerate
Manual Refine caveat: This process takes 5-10 minutes per image. For a single hero product shot, that’s fine. For batch processing 50 SKUs? You’ll want to use Phot.ai’s batch mode (detailed in my full review) and only manually refine the images that need it.
Step 4: Export — Which Format for What
Phot.ai lets you export in several formats. Here’s my rule of thumb for glass products:
| Format | Use case |
|---|---|
| PNG (with transparency) | Amazon listings, eBay, Etsy — keeps the glass transparency intact |
| JPG | Social media, blog posts — smaller file size |
| WebP | Website product pages — best compression-to-quality ratio |
Phot.ai vs. Traditional Clipping Path — Is It Worth It?
If you searched for “how to remove background from glass in Photoshop” before landing here — I get it. Manual clipping paths are the gold standard for transparent objects. But here’s the time comparison:
| Method | Time per image (glass) | Skill level | Cost per image |
|---|---|---|---|
| Manual Photoshop clipping path | 8–15 minutes | Advanced | $5–$15 (outsourced) |
| Phot.ai auto (simple glass) | 8 seconds | None | ~$0.04 (at lowest plan) |
| Phot.ai + Manual Refine | 5–10 minutes | Beginner | ~$0.04 + your time |
My take: For 80% of glass products (standard lighting, simple shapes), Phot.ai’s auto mode is good enough. For hero shots or complex lighting (like the poolside disaster above), you’ll either need Manual Refine or a traditional clipping path. But for $0.04 an image vs. $5+ for outsourced Photoshop work? The math speaks for itself.
If you already know Photoshop and just want faster results — read my full Phot.ai review here to see if it fits your workflow.
The Verdict: When to Use Phot.ai for Glass Products
✅ Use it when:
- Your glass product is well-lit with a simple background
- You need quick background removal for Amazon/eBay listings
- You have 50+ SKUs and can’t afford manual editing
- You’re okay with 80% usable, 20% needs refinement
❌ Don’t rely on it when:
- Your glass product has complex reflections or backlighting
- You need hero shots for brand campaigns (hire a pro photographer)
- The final output needs to be pixel-perfect no matter what
Bottom line: Phot.ai is the fastest tool I’ve tested for glass background removal — when it works. When it doesn’t, Manual Refine saves you, but it costs time. If you’re a solo seller looking to cut photography costs, it’s a no-brainer. The full review breaks down exactly where the limits are.
FAQs — Removing Background from Glass with Phot.ai
Can Phot.ai remove background from transparent glass?
Yes, but with caveats. For simple backgrounds and well-lit shots, Phot.ai handles transparent glass surprisingly well. For complex scenes with backlighting or reflective surfaces, you’ll need to use Manual Refine mode.
Why does Phot.ai struggle with glass products?
AI background removers identify subjects by detecting edges and color contrast. Glass is transparent — the AI can’t distinguish “glass body” from “background behind glass.” This causes the semi-opaque or “frosted plastic” effect you see in the Test 3 failure above.
Is Phot.ai better than Photoshop for glass background removal?
For speed? Absolutely — 8 seconds vs. 8 minutes. For precision? Photoshop still wins for complex glass shots. But at $0.04 per image vs. $5+ for outsourced Photoshop work, Phot.ai is the better choice for bulk product photography.
Does Phot.ai remove reflections from glass?
Partially. Phot.ai’s AI can reduce some glare and reflections, but it’s not designed as a dedicated reflection removal tool. For heavy reflections, you’ll get better results with a manual edit.
What’s the best Phot.ai plan for ecommerce sellers?
For occasional glass product edits, the Pay-As-You-Go plan ($12 for 100 credits) is fine. For regular batch processing, the Pro plan offers better value. Check the full review for plan breakdowns.
This is just the tutorial. If you want the full breakdown — including pricing plans, batch testing, and the exact list of products Phot.ai can and CAN’T handle — read the complete Phot.ai review here.
🚀 Ready to upgrade your product photography?
Try Phot.ai — the tool that aced our tests. Get 50 free credits to start.
Try Phot.ai Free →Affiliate Disclosure: Some links on this page are affiliate links. If you click and make a purchase, we may earn a commission — at no extra cost to you. See our full Affiliate Disclosure for details.
Former prop desk trader. I evaluate AI tools the way I used to evaluate trading systems — by running real tests and measuring actual ROI before recommending anything.